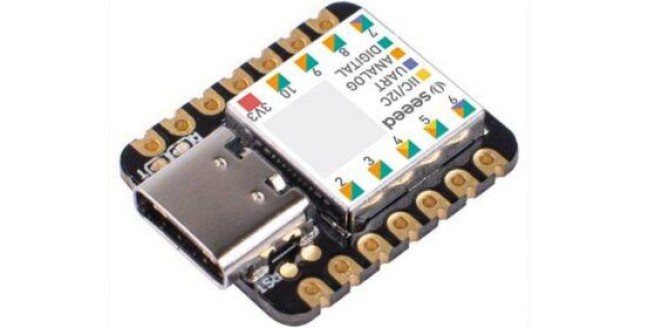
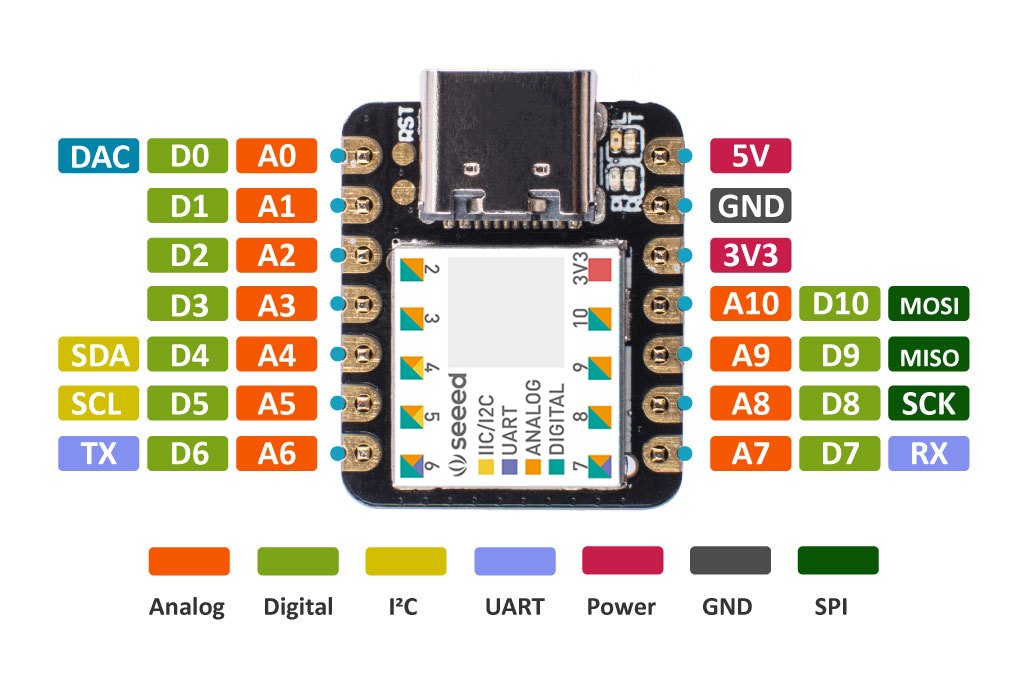
Together the Grove kit I received a mini board as well. I have been interested in this board, called Seeeduino XIAO, long time ago because it’s the smallest board I know and it includes USB-C!
I thought we may use this board in a big variety of projects because it is a tiny board with enough I/O pins, has a lot of memory, and is cheap.
Specifications
- CPU: ARM Cortex-M0+ CPU(SAMD21G18) running at up to 48MHz
- Storage:
- 256 KB Flash
- 32 KB SRAM
- 0 KB EEPROM
- 14 GPIO PINs:
- 11 analog PINs
- 11 digital PINs
- 1 DAC output Pin
- Interface:
- 1 I2C interface
- 1 UART interface
- 1 SPI interface
- Power supply and downloading interface: USB Type-C interface
- LEDs: 1 user LED, 1 power LED, two LEDs for serial port downloading
- Reset button: two reset button short connect to reset
- Power Pads: For the battery power supply
- Software compatibility: Compatible with Arduino IDE
- Projection cover for protecting the circuit
- Dimensions: 20 x 17.5 x 3.5 mm
Then, what can we do with this board? If we compare the main characteristic between an Arduino Pro Micro vs this board, we can see how both of them are quite similar except the working frequency and memory:
| Arduino Pro Micro | Seeeduino XIAO | |
| Working voltage: | 5V | 3.3V |
| Microcontroller: | ATmega32U4 | ARM Cortex-M0+ SAMD21G18 |
| Frequency: | 16 MHz, 8 bits | 48 MHz, 32 bits |
| Cores: | 1 | 1 |
| Program memory: | 32 KB | 256 KB |
| SRAM: | 2.5 KB | 32 KB |
| EEPROM: | 1 KB | 0 KB |
| GPIO PINs: | 18 | 14 |
| Digital PINs: | 12 | 11 |
| Analog PINs: | 9 (10 bits) | 11 (12 bits) |
| PWM: | 5 | 10 |
| Interruptions: | 5 | 11 |
| UART: | 1 | 1 |
| SPI: | 1 | 1 |
| I2C: | 1 | 1 |
| DAC: | 0 | 1 |
| USB: |
MicroUSB | USB-C |
| More info | More info |
I wanted to try as many thing as I could, but I don’t have any module (I don’ want to separate the Grove modules from the kit), so I decided to try some things that it’s possible to try only with the board.
Installation
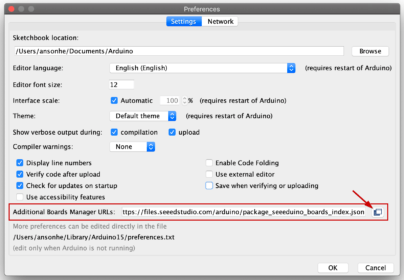
First, if we want to program this board using the Arduino IDE, we will need to install a new board. It isn’t including in the official repository, I don’t know why, so we need to add it manually. It’s easy, we just need to copy this link:
https://files.seeedstudio.com/arduino/package_seeeduino_boards_index.jsonHere (File > Preferences > Additional boards manager URL):
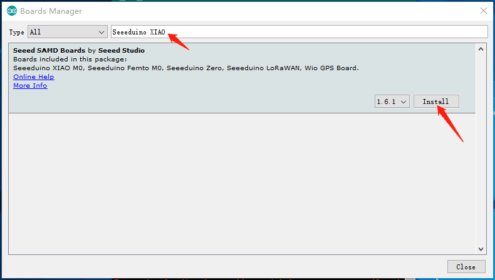
After that we will be able to search and install the board (Tools > Board > Boards Manager):
Examples
Blink
The typical blink code, the code is exactly the same than a normal Arduino.
|
1 2 3 4 5 6 7 8 9 10 11 12 13 14 15 |
const int pLED = 13; const int interval = 500; void setup() { pinMode(pLED, OUTPUT); } void loop() { digitalWrite(pLED, !digitalRead(pLED)); delay(interval); } |
Serial
The Serial code change a little bit because this board include a native USB, the meaning is that we have “two Serial connections”, the first one is connected to the USB and the second one is accessible by the I/O pins. We can use SerialUSB with the USB-C and Serial1 with another module connected there.
|
1 2 3 4 5 6 7 8 9 10 11 12 13 14 15 16 17 18 19 20 21 22 23 24 25 |
#define debug SerialUSB void setup() { debug.begin(9600); while( !debug ); } void loop() { unsigned long time = 0; static unsigned long prevTime = time; const unsigned long interval = 2000; time = millis(); if( time - prevTime >= interval ) { prevTime = time; debug.println(time); } } |
Human Interface Device
Another advantage for having a native USB is that we can use this module as Keyboard, Mouse or Gamepad.
|
1 2 3 4 5 6 7 8 9 10 11 12 13 14 15 16 17 18 19 20 21 22 23 24 25 26 27 28 29 30 31 32 |
#include "Keyboard.h" void setup() { Keyboard.begin(); } void loop() { static const String text = F("What is Arduino"); static const int length = text.length(); delay(3000); Keyboard.press(KEY_LEFT_GUI); Keyboard.releaseAll(); delay(500); for( int i=0 ; i<length ; i++ ) { Keyboard.print(text.charAt(i)); delay(500); } Keyboard.println(); delay(500); while(true); } |
FlashStorage
Finally, another thing that we can do is store some information and keep it after turning off the board. However, this board doesn’t include EEPROM, if we want to do that, we will need to use the FlashStorage library. It’s easier to use than the EEPROM library, but the memory will erase each time we write a sketch/code in the flash memory (this doesn’t happen with the EEPROM). So, if we use this memory to save the user configuration (maybe tipping it with a LCD menu), we will lose it when we update the code… in these cases I think is better use an external EEPROM module/chip.
|
1 2 3 4 5 6 7 8 9 10 11 12 13 14 15 16 17 18 19 20 21 22 23 24 25 26 27 28 29 30 31 32 33 34 35 36 37 38 39 40 41 42 |
#include <FlashStorage.h> #define debug SerialUSB typedef struct { boolean valid; unsigned long counter; } Data; Data data; FlashStorage(memory, Data); void setup() { debug.begin(9600); while( !debug ); data = memory.read(); if( data.valid != true ) { data.valid = true; data.counter = 0; } data.counter += 1; memory.write(data); } void loop() { debug.print("Counter: "); debug.println(data.counter); delay(3000); } |
Conclusion
It’s a good board, but I can’t think any reason to buy it instead of a ESP8266 or ESP32, both of them include good hardware and communications. Maybe if we don’t need these communications and we need a tiny board it can be good.
[notification type=”alert-success” close=”false” ]
[icon type=”glyphicon glyphicon-thumbs-up”] Good
- Tiny board.
- Power-full microcontroller.
- A lot of memory to save the sketch and execute our code.
- USB-C.
- Their website includes an Eagle library to add this board like a component, perfect to embed it in a new design. There are the design Eagle files as well.
[icon type=”glyphicon glyphicon-hand-right”] Normal
- It doesn’t have EEPROM.
- It doesn’t have reset button.
[icon type=”glyphicon glyphicon-thumbs-down”] Bad
- It doesn’t include any wireless communication like Bluetooth or WiFi.
- The board can be frozen if our code is wrong, then we need to load the bootloader that will fix it… for doing that we need “touch” the bootloader reset button using a cable because the board doesn’t include a physical button. I think they could have put a micro switch (I didn’t have this problem yet).
